Freelance Electronics Components Distributor
Closed Dec 25th-26th
800-300-1968
We Stock Hard to Find Parts

9245

Part # 9245
Description SWITCH P-P MOM NO 2POS CAP
Category SWITCH
Availability Out of Stock
Qty 0
Qty Price
1 + $0.28000


Technical Document


DISCLAIMER: The information provided herein is solely for informational purposes. Customers must be aware of the suitability of this product for their application, and consider that variable factors such as Manufacturer, Product Category, Date Codes, Pictures and Descriptions may differ from available inventory.

408- 2029
7 of 10Rev D
Single Crimp
SOLISTRAND Terminals
and Splices
Dual Crimp
SOLISTRAND Terminals
and Splices
Terminal
Parallel
Splice
Butt Splice
Terminal
3
1
5
2
1
5
3
1
5
2
4
3
1
1
5
2
4
1
3
1
Crimp centered. Crimp may be off center BUT NOT
OFF END OF WIRE BARREL.
2
3
4
5
Wire size stamped on terminal or splice matches
CMA of wire being used.
Insulation does not enter wire barrel.
Wire is visible through inspection hole of butt splice.
On terminals and parallel splices, bare wire ends
must be flush with or extend slightly beyond end of wire
barrel.
Crimps evenly spaced BUT N OT OVERLAPPED OR
OFF END OF WIRE BARREL.
Wire size stamped on terminal or splice matches
CMA of wire being used.
Insulation does not enter wire barrel.
Wire is visible through inspection hole of butt splice.
On terminals and parallel splices, bare wire ends
must be flush with or extend slightly beyond end
of wire barrel.
Wire Size
Stamped Under
Tongue
Wire Size
Stamped
on Splices
Wire Size
Stamped Under
Tongue
Parallel
Splice
Butt Splice
Wire Size
Stamped
on Splice
Figure 7
1
3
5
2
3
1
2
Wire Size
Stamped
on Splice
3
1
2
3
4
5
408- 2029
Rev D8 of 10
CABLE MAKER Battery Terminals
1
Crimps evenly spaced BUT N OT OVERLAPPED OR
OFF END OF WIRE BARREL.
2
3
4
5
Diameter of stripped wire is within wire diameter
range of terminal.
No nicked or missing conductor strands.
Wire fully inserted.
Selected die numbers match the number displayed in
Area 2.
1
2
3
4
5
Crimps properly located. Crimps must not be off end of wire
barrel.
End of conductor is flush or extended approximately
0.79 [.031] beyond end of terminal wire barrel.
Diameter of stripped wire is within wire diameter
range of terminal.
No nicked or missing conductor strands.
Selected die numbers match the number displayed in
Area 2.
Area 2
Area 2
Straight Terminal Flag Terminal
Straight T
erminal Flag Ter minal
1
2
3
4
5
1
3
4
Figure 8
2
5
Figure 9
Dies Bottomed
But Not Under
Pressure
No. 4 Dies in
Crimp Position
Adjustment
Screws
Lock
Screws
28.58 [1.125]
to
38.10 [1.500]
5. To loosen the adjustment:
a. --Turn both adjustment (ADJ) screws
COUNTERCLOCKWISE approximately 1/8 to
1/4 turn.
b. --Slightly loosen both lock (LOCK) screws by
turning them COUNTERCLOCKWISE.
c. --Flex the tool by opening and closing the tool
handles.
d. --Tighten both lock screws.
e. --Close the tool handles until the dies are
bottomed, but not under pressure. Check the
measurement between the tool handles and
repeat the adjustment procedure if necessary.
6. To tighten the adjustment:
a. --Turn both lock (LOCK) screws
COUNTERCLOCKWISE approximately 1/2 to
3/4 turn. --Turn both adjustment (ADJ) screws
CLOCKWISE approximately 1/8 to 1/4 turn.
b. --Flex the tool by opening and closing the tool
handles.
c. --Tighten both lock (LOCK) screws.
d. --- Close the tool handles until the dies are
bottomed but not under pressure. Check the
measurement between the tool handles and
repeat the adjustment procedure if necessary.
408- 2029
9 of 10Rev D
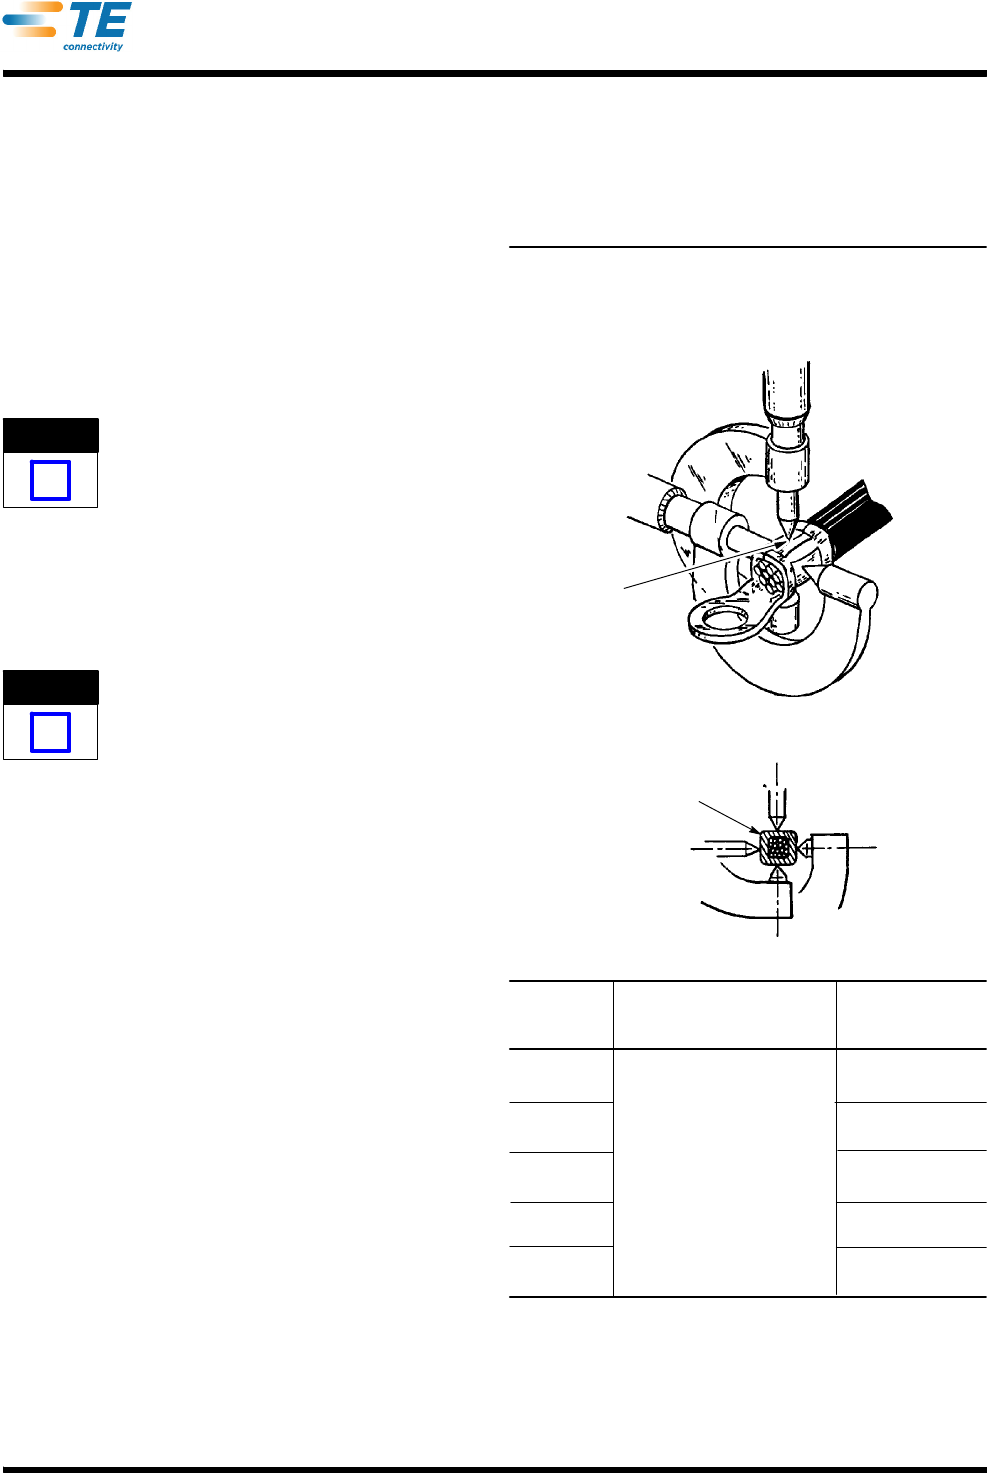
C. Crimp Height Inspection (Figure 10)
Crimp height inspections should be performed
periodically to determine if the tool is maintaining
proper crimping dimensions. To check the crimp
height:
1. Perform the handle adjustment inspection as
described in Paragraph B, Handle Adjustment
Inspection. Adjust the handles if necessary.
2. Crimp a properly prepared stranded wire in a
SOLISTRAND terminal or splice, as previously
described.
Do not use wires with missing conductor str ands.
3. Using a conventional cone--point micrometer ,
measure the crimp heights at the midpoints of flats
“A” and “B”, as shown in Figure 10. The SUM of
the two measurements equals the crimp height
dimension.
Do not allow the cone point to enter the terminal
brazed seam.
4. Figure 10 lists the crimp height dimension (sum
of A” and “B” measurements) range for each wire
size. If the measured dimension is within the listed
range, the die closure is considered dimensionally
correct.
5. If the measured crimp height dimension is not
within the specified range (and the tool handles are
properly adjusted), crimping tool should be
returned to TE for reconditioning. Refer to Section
8, REPAIR/REPLACEMENT.
8. REPAIR/REPLACEMENT
Replaceable parts are listed in Figure 11. Parts other
than those listed in Figure 11 should be replaced by
TE to ensure quality and reliability of the tool. Order
replacement parts through your TE representative, or
call 1--800--526--5142, or send a facsimile of your
purchase order to 1--717--986--7605, or write to:
CUSTOMER SERVICE (38--35)
TYCO ELECTRONICS CORPORATION
P.O. BOX 3608
HARRISBURG, PA 17105--3608
For tool repair service, please contact a TE
Representative at 1--800--526--5136.
9. REVISION SUMMARY
S Updated document to corporate requirements
S New logo
Figure 10
1/0
2
8
WIRE
SIZE,
AWG
CRIMP HEIGHT
DIMENSION
RANGE
CRIMP HEIGHT
MEASUREMENTH
MEASUREMENTS
“A” + “B” =
CRIMP HEIGHT
DIMENSION
Crimp Height Measurements
(Tool Handles Properly Adjusted. See paragraph 7.2, B)
“A”
“B”
“B”
Measure at
Midpoints
of Flats
Avoid
Brazed
Seam
Cross Section
of Crimped Wir e
Barrel
“A” + “B = Crimp
Height Dimension
“A”
H Tool handles properly adjusted.
10.46--11.05
[.412--.435]
13.00--13.59
[.512--.535]
6
16.23--16.92
[.639--.666]
4
19.41--20.14
[.764--.793]
22.63--23.42
[.891--.922]
NOTE
i
NOTE
i
PREVIOUS1234NEXT